I decided to write this as although a lot of guides on the internet provide a solid configuration for an nginx server, most of these guides will result in an IP leak somewhere under their configuration for the origin server somewhere.
So you got your nginx server setup (hopefully) and it’s serving your files (or being an effective reverse proxy), but maybe you’ve noticed loading static content (images, media, etc) load slowly… or maybe you realised that anyone can get the IP address of your website and therefore the box which is hosting it, and that creeps you out a bit. Or maybe your website doesn’t have that padlock everyone else’s has and it’s “not secure”. Luckily all these issues can be solved by Cloudflare! Or maybe your website is going through Cloudflare but sometimes you notice your origin server is still publicly displaying the website, and you want to stop this leak.
Unfortunately setting up Cloudflare for your website may seem simple, but setting it up securely and correctly to the inexperienced can be a difficult task. Although you may think your website is not leaking your origin IP address, it’s certainly possible that it is. This article will demonstrate how to secure your website through Cloudflare, and provide sample configurations to a hybrid nginx server which can be secure whether some vhosts are utilising Cloudflare and others aren’t (non-Cloudflare).
This is not a complete guide on how to setup nginx for speed or anything like that, please just rely on this for securing your vhosts and origin server.
This guide assumes you’re using the mainline version of nginx which will mean
your sites are located in /etc/nginx/conf.d/ and your nginx user is
nginx. To install the mainline version of nginx which is recommended by
the nginx team follow this
guide
here
- just remember this guide will not work with any version of Ubuntu except for
18.04 UNLESS you set the release name from
bionicto your release name which you can find on Google. Maybe I’ll write my own guide :)
Guide
Step 1 - Generating a self-signed SSL certificate for your default server
Why this is necessary
This is a step that many guides on the internet do not do and instead they ask you to get a Cloudflare Origin TLS certificate for all your sites. While this is good practice because you can use Full (Strict) mode for your SSL on Cloudflare, it’s not good to implement if you wish to conceal the identity of your origin server.
The reason why is because of this screenshot below.
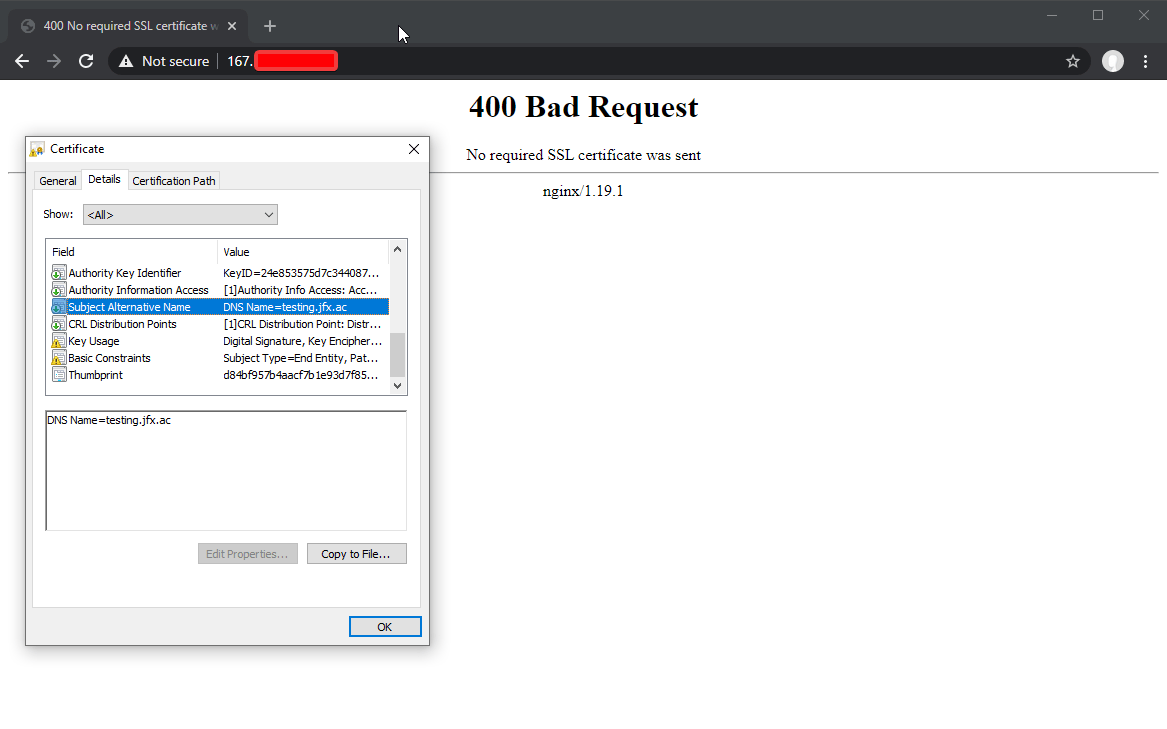
As you can see although no content is sent, the origin address of the website is exposed by the certificate being sent to the user. A simple web scraper could check the DNS of the certificate and easily expose the origin servers IP address.
This is a Cloudflare and nginx website I setup where the default_server block will send a Cloudflare Origin TLS Certificate and required Authenticated Origin Pulls. Don’t worry if you don’t have these setup, these are the next steps in the guide (Authenticated Origin Pulls). For reference this was following the DigitalOcean nginx+Cloudflare guide
Generating your certificate
Well that’s out of the way, here’s how to generate it. You will need to make sure you have openssl installed on your system.
This will generate a public and private certificate that will last for 15 years. Feel free to extend it.
sudo openssl req -x509 -nodes -days 5475 -newkey rsa:2048 -keyout /etc/ssl/private/nginx-selfsigned.pem -out /etc/ssl/certs/nginx-selfsigned.pem
It will ask you for some values, just keep them as the default and maybe change your country name if desired. We will use this later in our nginx setup.
Step 2 - Adding the Self Signed Certificate to nginx
For this guide I’m assuming your nginx configurations are stored in /etc/nginx/conf.d/ mainline branch, otherwise you can follow along with /etc/nginx/sites-available/
Nginx will give us a default server file which will give you the following output once viewing your website:
This file (default.conf) can be rewritten to default.old (if in conf.d) - or removed from your sites-enabled folder, and should be replaced with this new file:
sudo nano /etc/nginx/conf.d/default.conf
server {
    listen 80 default_server;
    listen [::]:80 default_server;
    server_name _;
    return 403;
}

server {
    # SSL configuration
    listen 443 ssl http2 default_server;
    listen [::]:443 ssl http2 default_server;
    ssl_certificate /etc/ssl/certs/nginx-selfsigned.pem;
    ssl_certificate_key /etc/ssl/private/nginx-selfsigned.pem;
    server_name _;
    return 403;
}
Then type sudo nginx -t to make sure your configuration is correct before
typing sudo systemctl restart nginx to restart nginx to respond to the
configuration change.
This provides us with a base setup. If a request comes to the origin server and it does not have a server block it will come back as 403. Try test it out by going to the IP address of your box on http:// and https://
Step 3 - Configuring a host
After this we can actually configure a host we would like to route properly
through Cloudflare and nginx (yay)! aka something that isn’t our default_server.
For the sake of this tutorial I’ve made a /var/www/ folder and have my
nginx pointed to /var/www/test/ - the config is below. If you want to
follow along, make sure you run these commands.
3.1 - Making a test host (skippable if you have content already)
This little micro step is skippable if you have a host working already serving content. If you wish to skip click here to 3.2.
mkdir -p /var/www/test/
sudo chown -R nginx:nginx /var/www/
sudo find /var/www -type f -exec chmod 664 {} \;
sudo find /var/www -type d -exec chmod 775 {} \;
sudo find /var/www -type d -exec chmod g+s {} \;
I actually copied most of these perms from this guide. Essentially:
- changes the owner of /var/www to nginx and anyone in the nginx group.
- adds 644 permissions (-rw-rw-r–) to all files in /var/www.
- adds 775 permissions (drwxrwxr-x) to all directories in /var/www.
- sets the SGID bit on /var/www and all directories therein; This means that all new files and subdirectories created within the current directory inherit the group ID of the directory, rather than the primary group ID of the user who created the file. This will also be passed on to new subdirectories created in the current directory.
Reminder if your nginx user is www-data the chown command should have www-data:www-data instead of nginx:nginx
Make sure your user is in the nginx (or www-data) group, by typing groups
USERNAME. If you cannot see the group listed, run:
sudo usermod -aG nginx USERNAME
and restart your shell.
This will make the required folders and give nginx ownership of them. Essentially we are setting up our /var/www/ environment to be able to serve a website.
3.2 - Host Config
Below is a sample of a nginx config that will simply display the static content of the website. If you have an existing host make sure you have any missing fields (namely the SSL certificate ones) - and the include file.
Below is a few optimisations we can add to nginx to increase speed but also increase its security.
- Using a custom resolver Cloudflare’s DNS server will result in increased speed for any DNS queries your server runs.
- gzip compression will mean static content will be served faster.
- The SSL protocols changes will ensure only
TLS 1.2 and TLS 1.3are used between your site and your visitors (Cloudflare in this case) - resulting in a secure transport. - The SSL ciphers listed are more safe and secure than the defaults and aid performance, which will help secure the communication between Cloudflare and your server.
- The dhparam setting will need an additional command to get working, but essentially it allows nginx to use pre-calculated field primes and generator values to reduce resource heavy calculations on your host.
You will need to make an includes folder sudo mkdir /etc/nginx/includes
then run this command to generate dhparams sudo openssl dhparam -out
/etc/nginx/includes/dhparam.pem 4096
Then add this conf file:
sudo nano /etc/nginx/includes/common_opts.conf
resolver 1.1.1.1 1.0.0.1 valid=300s;
resolver_timeout 10s;
gzip on;
gzip_vary on;
gzip_min_length 1000;
gzip_proxied any;
gzip_comp_level 6;
gzip_types text/plain text/css text/xml application/xml text/javascript application/x-javascript image/svg+xml;
gzip_disable "MSIE [1-6]\.";
ssl_prefer_server_ciphers on;
ssl_protocols TLSv1.2 TLSv1.3;
ssl_ciphers 'ECDHE-ECDSA-CHACHA20-POLY1305:ECDHE-RSA-CHACHA20-POLY1305:ECDHE-ECDSA-AES128-GCM-SHA256:ECDHE-RSA-AES128-GCM-SHA256:ECDHE-ECDSA-AES256-GCM-SHA384:ECDHE-RSA-AES256-GCM-SHA384:DHE-RSA-AES128-GCM-SHA256:DHE-RSA-AES256-GCM-SHA384:ECDHE-ECDSA-AES128-SHA256:ECDHE-RSA-AES128-SHA256:ECDHE-ECDSA-AES128-SHA:ECDHE-RSA-AES256-SHA384:ECDHE-RSA-AES128-SHA:ECDHE-ECDSA-AES256-SHA384:ECDHE-ECDSA-AES256-SHA:ECDHE-RSA-AES256-SHA:DHE-RSA-AES128-SHA256:DHE-RSA-AES128-SHA:DHE-RSA-AES256-SHA256:DHE-RSA-AES256-SHA:ECDHE-ECDSA-DES-CBC3-SHA:ECDHE-RSA-DES-CBC3-SHA:EDH-RSA-DES-CBC3-SHA:AES128-GCM-SHA256:AES256-GCM-SHA384:AES128-SHA256:AES256-SHA256:AES128-SHA:AES256-SHA:DES-CBC3-SHA:!DSS';
# use a dhparam
ssl_dhparam /etc/nginx/includes/dhparam.pem;
Here’s our base configuration file, make sure we import the conf file from the includes folder above.
sudo nano /etc/nginx/conf.d/test.conf
server {
    # SSL configuration
    listen 443 ssl http2;
    listen [::]:443 ssl http2;
    ssl_certificate /etc/ssl/certs/nginx-selfsigned.pem;
    ssl_certificate_key /etc/ssl/private/nginx-selfsigned.pem;
    include /etc/nginx/includes/common_opts.conf;
    server_name testing.jfx.ac;

    location /  {
        root /var/www/test
        index index.html;
    }
}
As you can see the config has no HTTP support, this is because Cloudflare can do automatic HTTPS rewrites, so why bother. Feel free to add this block in if you wish to have this functionality though.
server {
    listen 80;
    listen [::]:80;

    server_name testing.jfx.ac;
    return 302 https://$server_name$request_uri;
}
Here is a friendly Hello World for HTML so we know it’s working :)
nano /var/www/test/index.html
<html>
Hello World!
</html>
And this will display our testing page when we go to our site, yay!
Step 4 - Securing your hosts so only Cloudflare can access them
Why
As for why this is important, we can see that it appears the site is only
serving the data if the user is going to the correct domain
https://testing.jfx.ac - no way the origin can be exposed right? This is
wrong. With a simple curl command it is easy to bypass the load balancer by
spoofing our Host header.
jfx@PC:~$ curl --insecure --header 'Host: testing.jfx.ac' 'https://xxx.xxx.xxx.xx/'
<html>
Hello World!
</html>
Scary stuff, what if someone was going through IP ranges and found our origin server this way? There’s actually a few ways to stop this, but the easiest way to stop this is to implement Authenticated Origin Pulls! More information is here from Cloudflare themselves. You can also block all HTTP/HTTPS traffic to your box unless it’s from Cloudflare using a firewall (such as UFW), this step is also explained but there are pros and cons for this which are listed below.
| Method | Pros | Cons |
|---|---|---|
| Authenticated Origin Pulls |
|
|
| Firewall Blocking |
|
|
4.1 - Adding Authenticated Origin Pulls (easy)
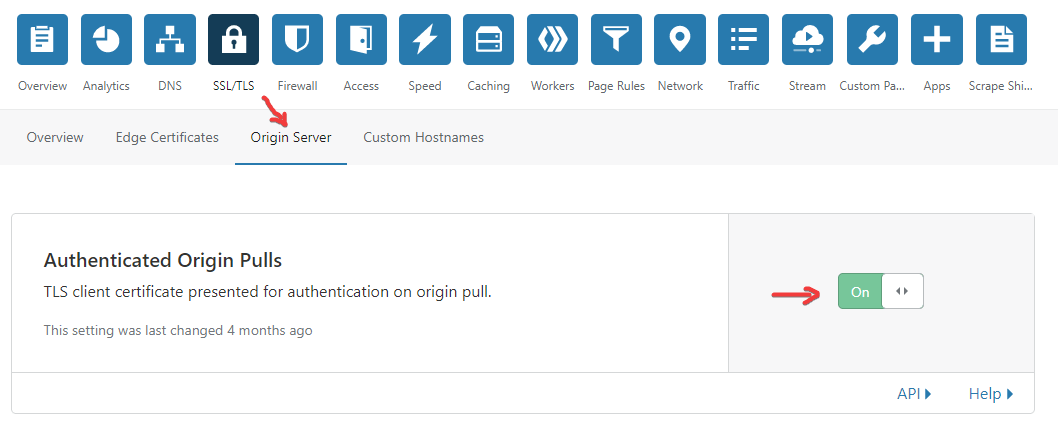
Firstly, make sure this feature is enabled on Cloudflare or the following steps will break your site. To enable it, go to Cloudflare and go to SSL/TLS -> Origin Server -> ON for Authenticated Origin Pulls:
Next to setup Authenticated Origin Pulls on nginx, go
here and at the
bottom of the page download the origin-pull-ca.pem file. Once downloaded,
copy its contents and output it to /etc/ssl/certs/cloudflare-origin.pem
sudo nano /etc/ssl/certs/cloudflare-origin.pem
*contents of origin-pull-ca.pem*
Once that’s done, go back to your nginx config and add this to your SSL server block.
sudo nano /etc/nginx/conf.d/test.conf
ssl_client_certificate /etc/ssl/certs/cloudflare-origin.pem;
ssl_verify_client on;
It should look like this
server {
    # SSL configuration
    listen 443 ssl http2;
    listen [::]:443 ssl http2;
    ssl_certificate /etc/ssl/certs/nginx-selfsigned.pem;
    ssl_certificate_key /etc/ssl/private/nginx-selfsigned.pem;
    ssl_client_certificate /etc/ssl/certs/cloudflare-origin.pem;
    ssl_verify_client on;
    include /etc/nginx/includes/common_opts.conf;
    server_name testing.jfx.ac;

    location /  {
        root /var/www/test
        index index.html;
    }
}
A note: you do not need to use Cloudflare’s generated SSL certificates if you wish to use Authenticated Origin Pulls.
Don’t forget to run sudo nginx -t and sudo systemctl restart nginx
to reload your config!
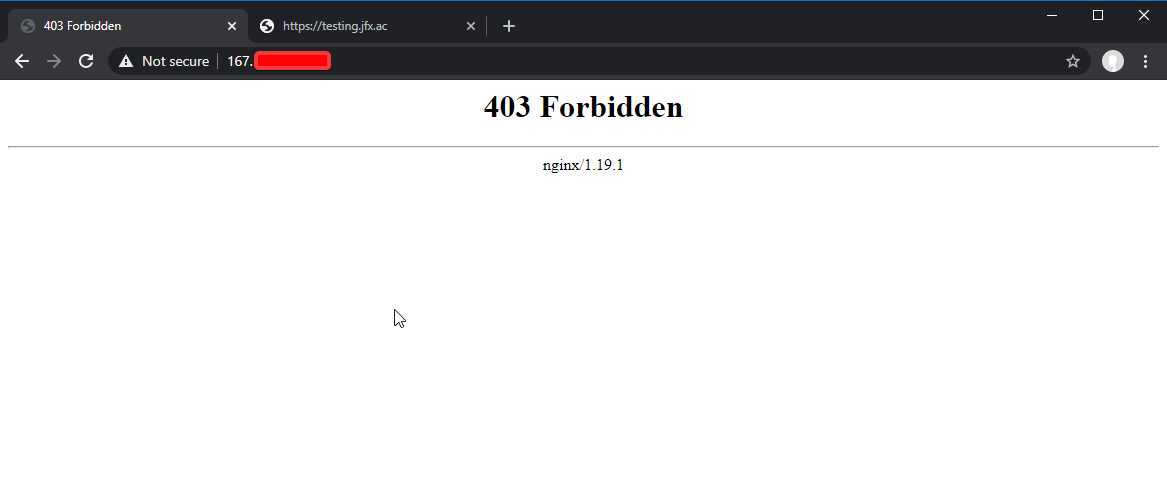
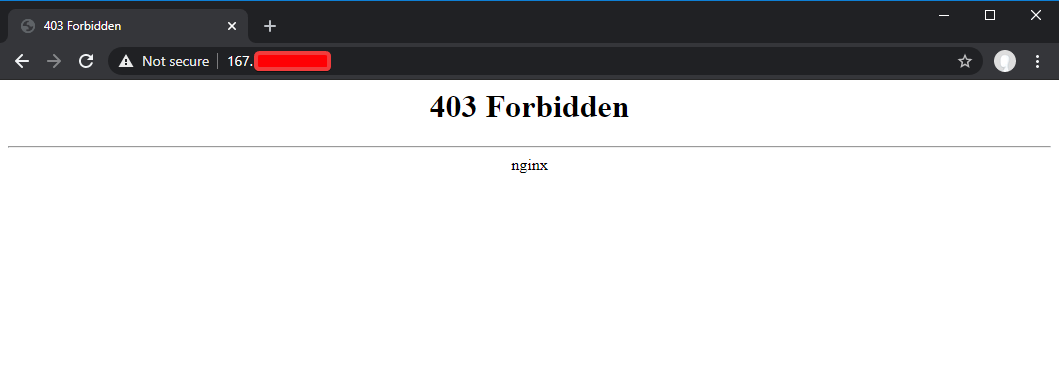
If we go to our website, we won’t notice a difference, but let’s try this curl spoof again:
jfx@PC:~$ curl --insecure --header 'Host: testing.jfx.ac' 'https://167.172.213.53/'
<html>
<head><title>400 No required SSL certificate was sent</title></head>
<body>
<center><h1>400 Bad Request</h1></center>
<center>No required SSL certificate was sent</center>
<hr><center>nginx/1.19.1</center>
</body>
</html>
Mad stuff, now we have protected our site from people trying to grab our origin IP address!
There is a catch though, a 400 will return on any page where something is trying
to spoof, but a 403 will return on the IP without a Host header. This gives away
the fact that we are trying to be safe and only accept Cloudflare’s requests. A
solution to this problem is simply adding the ssl_client_certificate and
ssl_verify_client from above also to default.conf. With these, the error
being returned will be consistent with that as the one shown above. To do this,
edit default.conf and add those two lines in so it looks like this:
sudo nano /etc/nginx/conf.d/default.conf
server {
    listen 80 default_server;
    listen [::]:80 default_server;
    server_name _;
    return 403;
}

server {
    # SSL configuration
    listen 443 ssl http2 default_server;
    listen [::]:443 ssl http2 default_server;
    ssl_certificate /etc/ssl/certs/nginx-selfsigned.pem;
    ssl_certificate_key /etc/ssl/private/nginx-selfsigned.pem;
    ssl_client_certificate /etc/ssl/certs/cloudflare-origin.pem;
    ssl_verify_client on;
    server_name _;
    return 403;
}
With this there will be no way to determine whether or not the web server is trying to hide itself with a client certificate under a specific host.
4.2 - Blocking all HTTP/HTTPS traffic except for Cloudflare (safest)
It is possible using iptables or ufw to block all web traffic coming to your server unless it’s from Cloudflare. Personally I think for a production environment this is the most safe and most bulletproof approach, as if you expect all your web traffic to come out of Cloudflare - there’s no benefit from having a public facing web server. From a security standpoint this is also the most effective. Whilst also enforcing the technique above (Authenticated Origin Pulls) you can add more security if you’re paranoid like me.
The issue with this if you wish to have a host not go through Cloudflare, then this will not be possible (unless you whitelist visitors IPs).
How to
I have a handy script located here which will grab Cloudflare’s IP range list and output a file for use with the Real IPs nginx module. This script can also optionally add UFW rules for allowing Cloudflare IPs for https and http. If your UFW is set to block all incoming, then this will only allow incoming requests on ports 80 and 443 to Cloudflare IPs. I’m not going to write up how to setup UFW, there’s a nice DigitalOcean tutorial here. Just a word of caution: make sure you’ve disabled any existing HTTP/HTTPS rules before relying on this script. In the scripts README it tells you how to run it as a cron job so you stay on top of any updates to the Cloudflare IP range.
Make sure you run the script as root and edit the UFW_RULES=false line to
UFW_RULES=true
Discussion
I’m going to break the discussion into two sections:
- Common issues you may have with a Cloudflare setup and how to resolve them
- Even tougher security methods than shown above (but are worth looking at!)
Common issues
nginx not displaying Real IPs for any visitor!
I have a handy script located here which will grab Cloudflare’s IP range list and output a file for use with the Real IPs nginx module. This is also the same script used in the traffic blocking section of the security section below, so if you wish to do both read on!
To install the README does a good job of explaining, but essentially if you run this script it will start working like magic! You will need to automate this script (crontab recommended) to keep track of the Cloudflare IP range. A guide on how to is in the README for the script.
Security
Cloudflare Security Settings
Not related to nginx specifically (hence why it’s down here), but these are settings which are good to have on for your website in Cloudflare. Go to SSL/TLS->Edge Certificates to enable them:
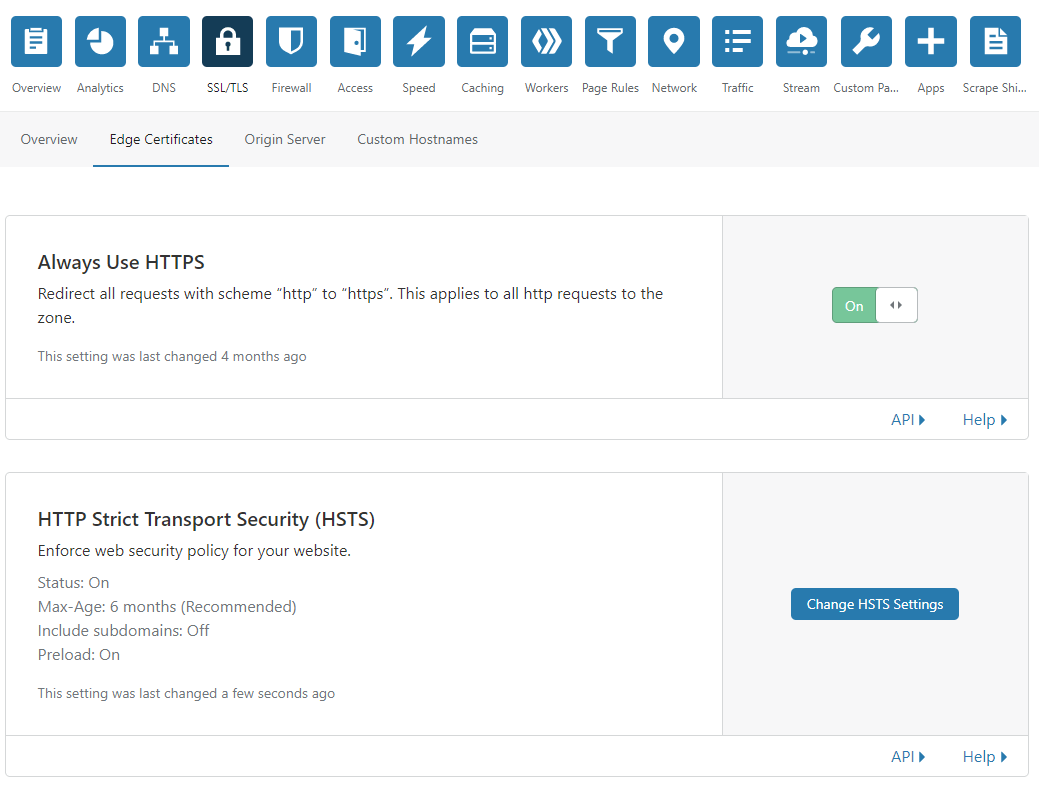
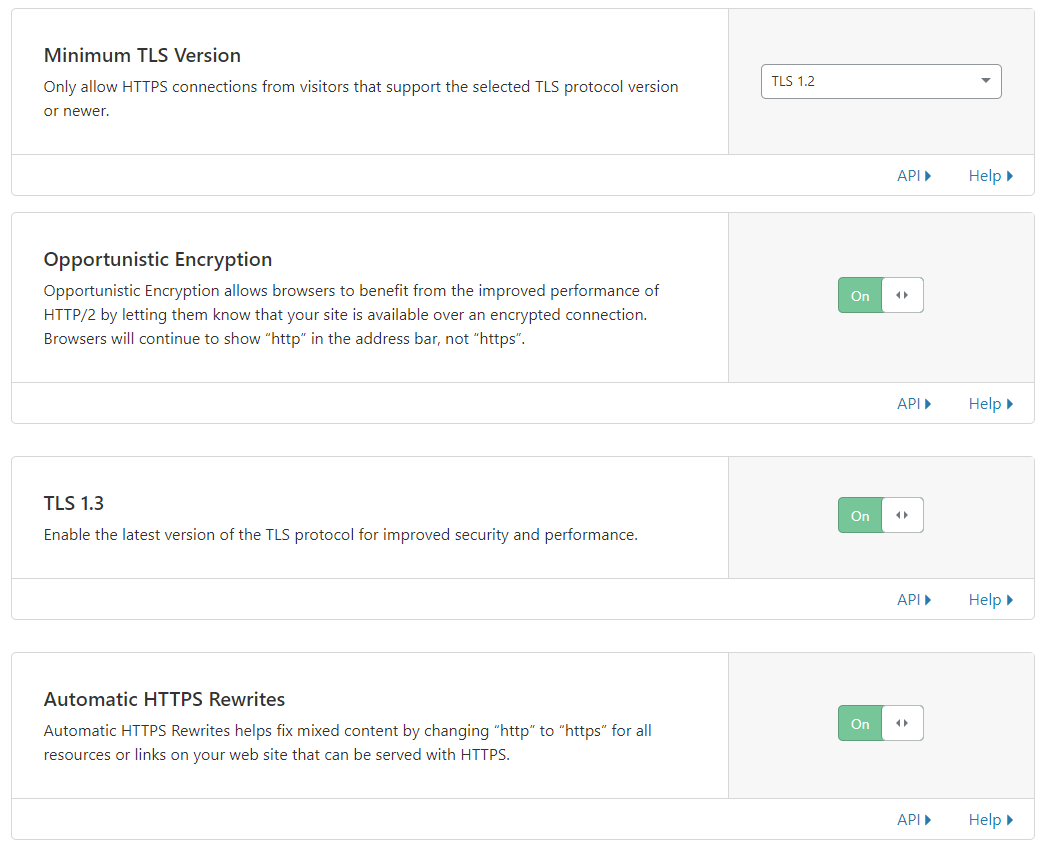
Feel free to turn HSTS on for subdomains, I have it off since I do testing stuff on some of my subdomains, but it’s good practice to have on!
Disabling security tokens
You should be disabling security tokens on your nginx configuration which stops
your nginx version being published on your website (typically shown on error
pages). To do so go to your nginx.conf file which should be located at
/etc/nginx/nginx.conf and add this line in the http block.
sudo nano /etc/nginx/nginx.conf
http {
    server_tokens off;
    ...
    ...
}
After restarting nginx sudo nginx -t and sudo systemctl restart nginx any “bad” page or 404 error, etc, should now look like this:
Blocking any ports you reverse proxy from being public
This one goes without saying, and while this guide doesn’t aim to be a reverse proxy how-to - it’s worth mentioning. If you reverse proxy a service through nginx, you most definitely should block it’s traffic (the port your reverse proxying through nginx) using a firewall such as UFW. I’m not going to write a guide on how-to do all this, but check out the DigitalOcean tutorial here on how to get started with ufw. Just make sure your web server is accessible when you enable ufw, which is mentioned how to do in the article.
End
This is my first blog post so I don’t know how well this will be received, but hopefully this helps someone setting up nginx and wanting to be security conscious.
Thank you for reading
Thank you so much for reading my post. If you have any feedback or queries, please reach out to me. My details are on the home page.